Back up your App Inventor projects by saving them to your computer’s hard drive.
To save a copy of an individual App Inventor project, open the project and select Projects | Export selected project (.aia) to my computer.


Back up your App Inventor projects by saving them to your computer’s hard drive.
To save a copy of an individual App Inventor project, open the project and select Projects | Export selected project (.aia) to my computer.
You have probably run your App Inventor apps through AI Companion. The AI Companion is a great tool for quickly loading the app you are developing on to your phone for testing. However, the AI Companion does not install the app on to your phone, like a regular app.
To install the app on your phone, use the Build menu “App (provide QR code for .apk)”. You will see a progress bar appear on your screen as App Inventor prepares the app for installation on your phone. Behind the scenes, it is creating a “.apk” file which is the type of file used for all Android applications.
 Once the app build process is finished, you’ll see a QR code displayed on your screen:

If you are not familiar with QR codes – a QR code is a method of encoding data into a matrix. A smart phone camera takes a snapshot of the QR code matrix and software on the phone extracts the encoded data. In this case, the data is the URL or web address where a temporary copy of your .apk file has been stored. You’ll need to install a QR code reading app (available for free in the Google Play store) and use it to scan the code. Then, follow the on screen prompts and icon to download the .apk file to your phone and then install the app on to your phone. Once installed, it will appear in your list of apps just like any other app.
If you do not wish to use the QR code method, you can also build and download the .apk file directly to your computer. Once the .apk file is on your computer, you could email the .apk file as an attachment – such as email it to yourself! Then, on your phone, fetch your email and download and install the apk file on to your phone.
What the App Does
This is the fifth version of 5 app versions that implement a tip calculator – and the final version is pretty cool! This app is useful – I was recently traveling and used it on my smart phone to calculate restaurant tips – I will post a short tutorial on how to install this app on your phone.
In Version 5, we eliminate the “Calculate tip and total amount” button by making the calculation automatic. Each time we enter a digit or adjust the slider, the tip is calculated immediately. There is no need to press a button to do the calculation. Just enter a bill amount and optionally adjust the slider to select a tip percentage.
The Tip Calculator User Interface
The new user interface eliminates the Calculate button and adds a single “Clear All” button as a quick way to reset the calculator. This sets the bill amount back to zero and the tip amount to 20%.
Here is a view of the app in operation – the bill amount of 23.45 has been entered on the keypad and the tip amount is 20%. The tip and total bill are shown at the bottom of the screen.
Each time any digit is entered – or the tip is adjusted – the tip and total is automatically calculated.

You can change the colors of buttons (and some other components) in your App Inventor apps. Using some programming tricks, buttons can be made to change color continuously!
Here is a very short demo of a button whose color is continuously changing on the screen:
I will soon post a tutorial on how to do simple color changes and also how to do “tricks” like that shown in this video.
Be sure to keep checking back, like us on Facebook, Google+ and Twitter for more updates! Thanks!
This is not obvious but … you can select a group of blocks and press Ctrl-C (on Windows) and then press Ctrl-V (on Windows) to copy and paste your blocks.
Press Ctrl-X (on Windows) to delete a selected group of blocks. If you did not mean to delete those blocks, press Ctrl-V and paste them back!
Another trick is to select a block or blocks and then press right-click on your mouse (or Ctrl-click on Mac OS X) and then select Duplicate from the popup menu. Copy and paste should also work on Mac OS X using the standard Mac OS X keystrokes but I have not yet tested it there.
I have created an online poll – see side bar at right of this post – to learn about what type of tutorials you prefer? Please click on your choice —> at right!
Help me know what works best for the most readers by answering the simple poll at right – you do not need to log in or go through extra hurdles. Just click on one of the selections.
Thank you!
What is ListPicker?
ListPicker is a user interface component that makes it easy to display a list of items and have the user make a selection from the list. For example, let’s say we’d like to display six things on the screen and then have the user select an item from the list.
For simplicity, here is a sample ListPicker list showing six items labeled “A”, “B”, “C”, “D”, “E” and “F”. Those items are arbitrary – your list could contain “Oranges”, “Bananas”, “Apples”, “Grapes” or whatever other text descriptions you would like to have. (The default color is white text on black but the color properties, as well as the text size, may be changed in the App Inventor Designer.)

When this screen is displayed the user may touch an item in the list to select it.
Use ListPicker whenever you have a set of items from which the user is expected to make a selection. Example applications could include selecting a product from a list of inventory items, select a food item from a menu, select a name from a display of names and addresses and many more.
Learning how to use ListPicker is helpful for new App Inventor programmers as many online tutorials and example programs use ListPicker – but without explaining what it is or how to use it! Becoming familiar with ListPicker will make those other tutorials easier to understand!
Example
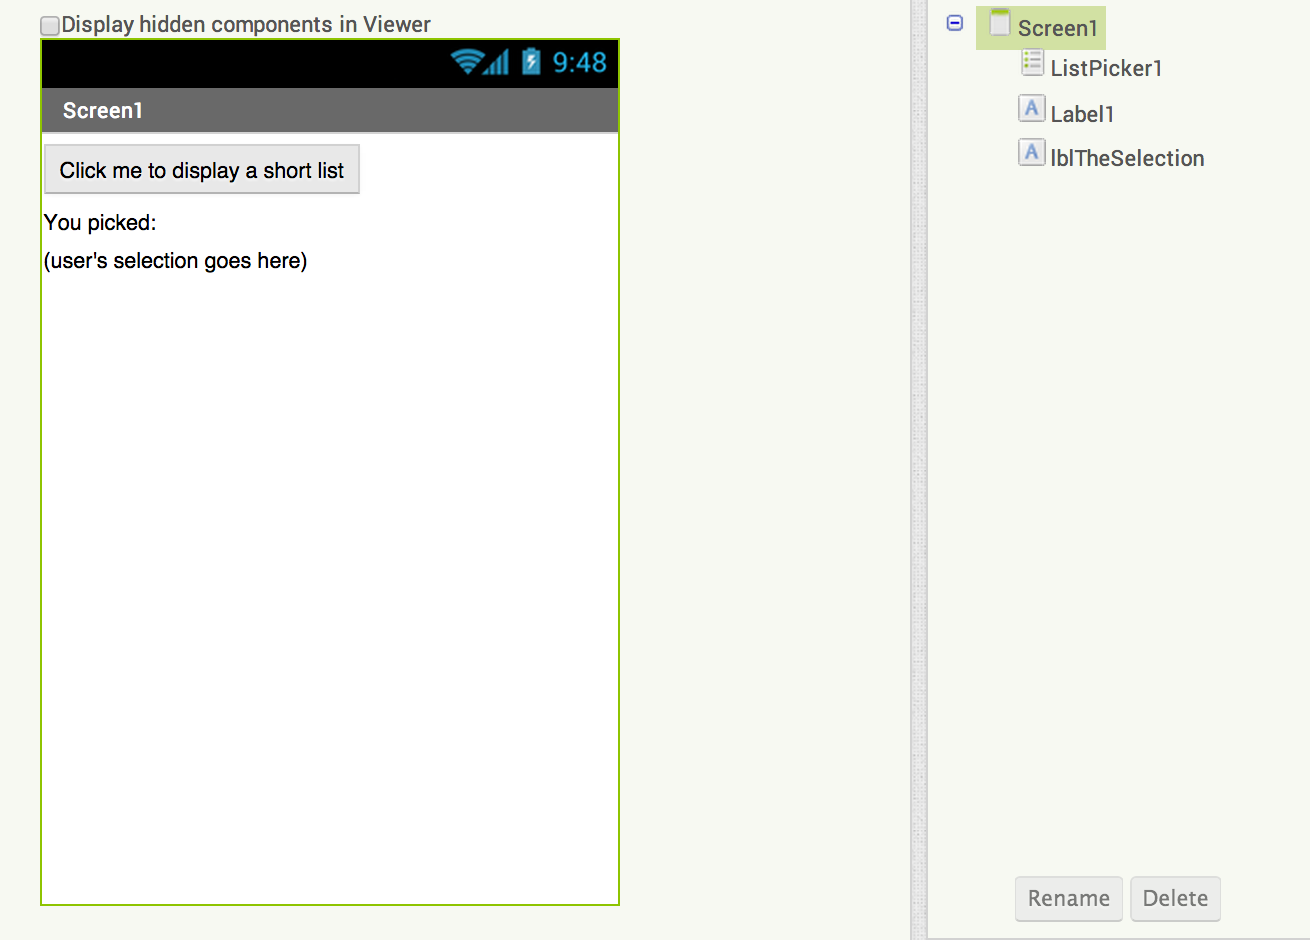
When an item is selected an event is created, and your event handler can then identify which item was selected in this list. To illustrate, let’s start with a simple app that displays a list of items when the “Click me to display a short list” is pressed:

ListPicker does all the hard work for us – display the items on screen (as shown in the previous screen snap shot) and processing the selected element.
In the example above, “C” was selected.
How to Build the ListPicker Demonstration Application
Step 1 is to drag a ListPicker component from the Palette to the Viewer. Rename the control if you wish and change the text of the ListPicker control button to something useful 🙂 Here is the app after dragging the ListPicker component and changing the text (in the ListPicker properties) to “Click me to display a short list”:
Step 2 is to place some items into the list. We do that by typing a comma separated list in the ElementsFromString property of ListPicker, as shown here:

We have now added six items – A, B, C, D, E and F. We could enter longer text descriptions if we wished – for example “Oranges, Bananas,Apples” and so on:

Step 3 is to add an event handler for the list to process the list selection – this turns out to be really super hard – not! It is actually super easy! Click on the ListPicker component in the Blocks Editor and then drag the .AfterPicking event into your program:
 ListPicker handles all the details of the on screen selection. All that is needed is to fetch the item that was selected, store that in a variable, or, as in this example, display the selection in a label field on the app’s screen.
That’s it for the basic operation of the ListPicker. If you have many elements – too many to fit on one screen – the list automatically handles scrolling. Just use your finger to drag up or down the list. You can also change ListPicker properties such as the color of the list and more.
Of course there are many ListPicker features, but this is intended as a brief introduction.
But one feature we wish to mention is that you can add items to the list to display from within your program by putting your items in a list and assigning them as shown here:
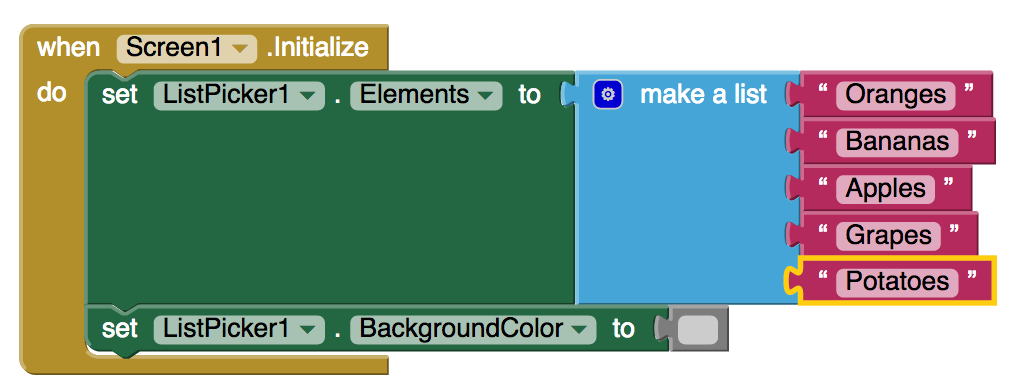 The ListPicker1.Elements property contains a programmatic list of items. If you are not familiar with lists, please see Chapter 8 “Introduction to Lists” in my e-book “Guide to App Inventor 2:Tutorial – The fast and easy way to create Android apps”.
Would it be neat if you could display pages from the web in your Android app? Well, you can!
And it is very easy to do in App Inventor.
In the Designer, drop a WebViewer control on to your app’s screen design area. The WebViewer control is located at the bottom of the user interface section of the Palette:

After dropping the control on to your user interface, select the control and set the Properties. In particular, set a default or initial web URL to display on the screen. Here, I have set the default URL to http://appinventor.pevest.com. Be sure to include the leading http://

When your app runs, the WebViewer will automatically load the page at the HomeURL.
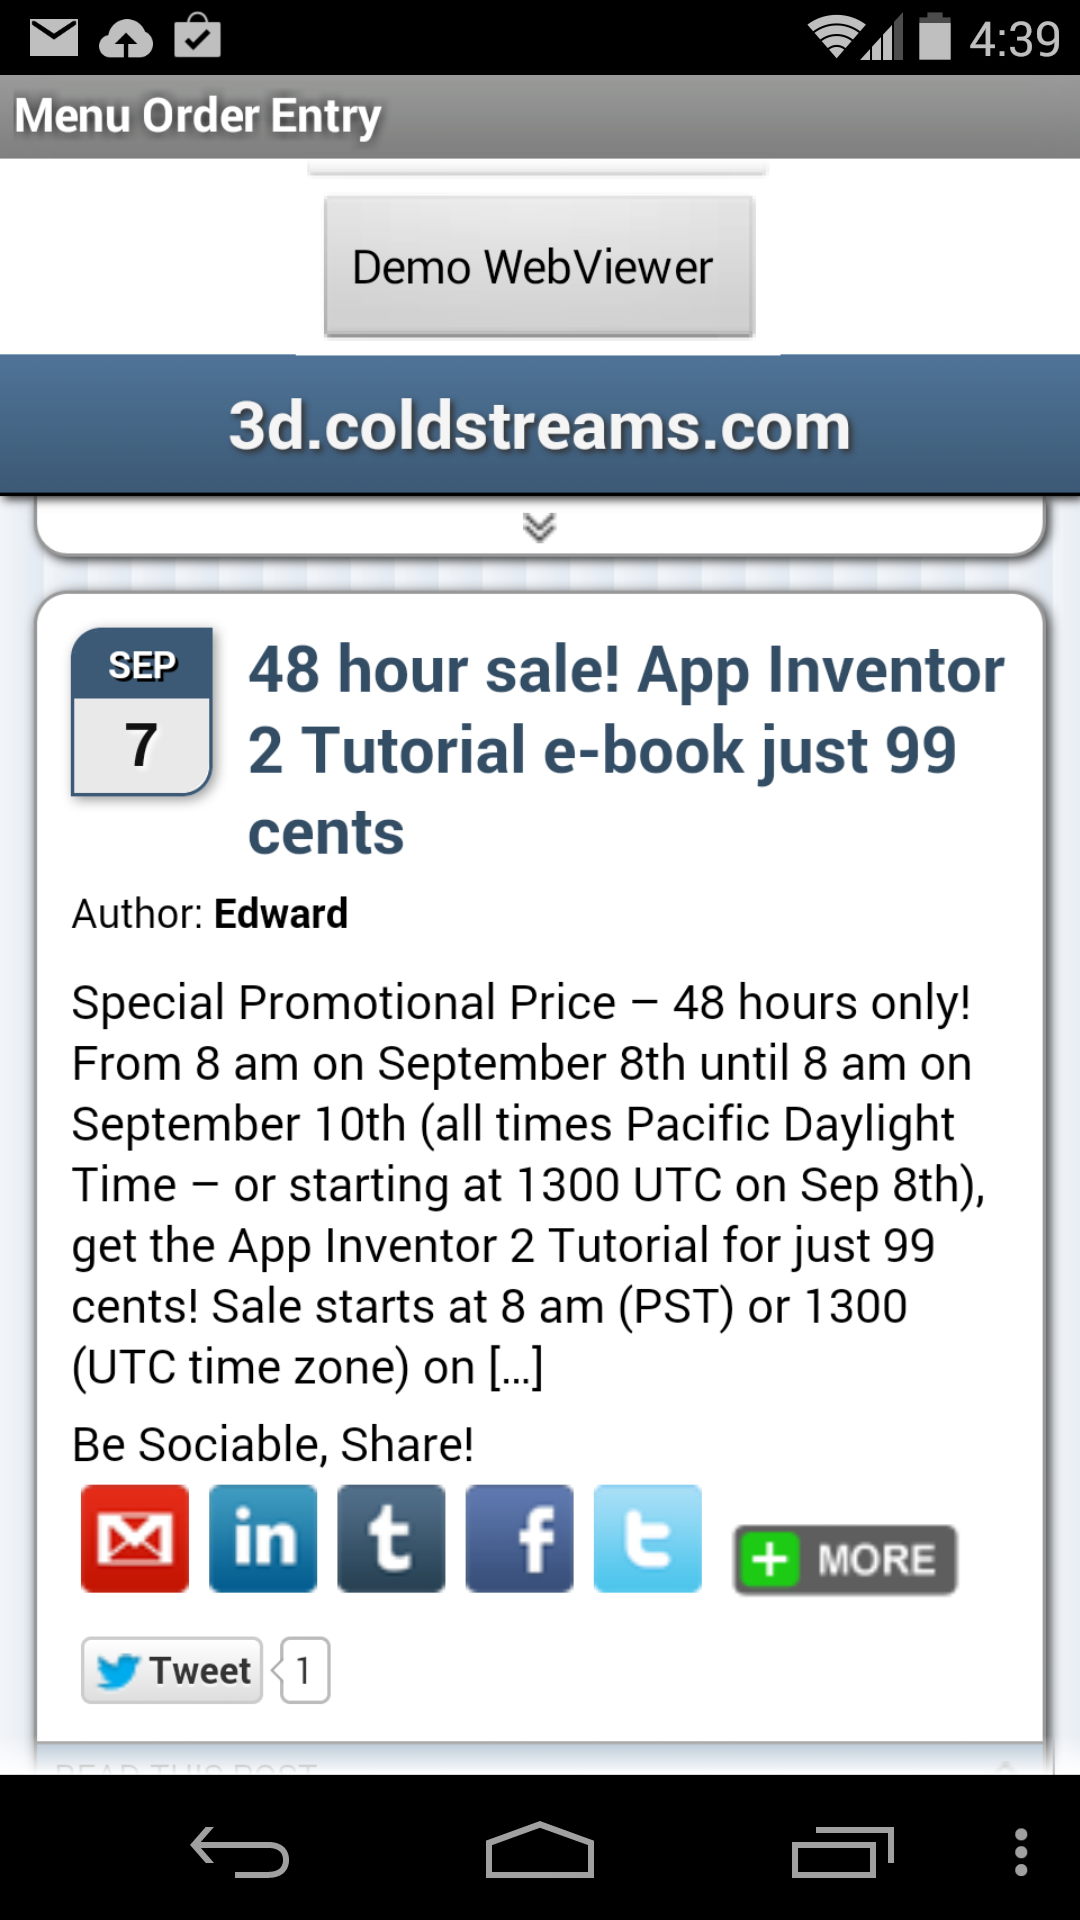
You can change this page, programmatically. Here, for example, in response to a button press, the URL is changed to my 3D blog.

Once this runs, the new page is read in to the viewer. Just like this!
Whether you use Windows, Linux or Mac OS X applications, when the program needs to alert the user (you!) to an issue, the program displays a pop up dialog box with a warning or error message. You can easily create similar warning messages in App Inventor, as shown in this example screen:

To create a pop up warning dialog, use the Notifier control that appears in the Designer’s Palette:

Drag the Notifier icon into the app user interface design – the Notifier is used as a non-visible component, just below the user interface:

Switch to the Blocks view, click on the Notifier1 block to view the available methods. A partial list of methods is shown here – the item circled in red is the one we will use in this example:

In response to an on screen button press (btnNotifyUser’s Click event), the app displays the dialog message:
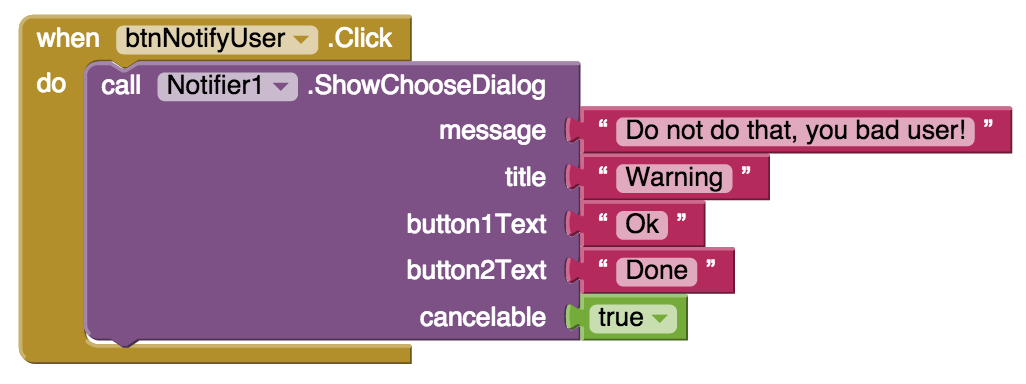 This block can be inserted anywhere a processing block is allowed such as the result of an if-then-else conditional block. You can also change the text or background color of the app to something more interesting than the “black and white” default colors shown in this example.
Notifier provides a quick and easy way to display short alert messages to the user of the app.
Update: When the program is run in AI2 Companion, it behaves differently than when run as a standalone “build” .apk app.
The updated tutorial explains where – and why – the files you create may appear to be hidden on the phone – how to find them and how to transfer the files to your PC.
An earlier blog post described how to store data using TinyDB so that an app’s data can persist between uses of the program, or even to share data between screens in a program.
Another way to save data is to write the data to a file on your Android device. App Inventor has introduced a File control that lets us write text data to a file and then read it back, later. As we will see, the File control is not the easiest thing to use but with some work, the control can be used to store data from our program into a file. (Once data is in a file, you could, hypothetically, email the file to yourself to read it on a computer, or transfer it from an Android to device to another computer using a USB cable and mounting the device as a simulated hard drive. But that is beyond the scope of this blog post!)
Let’s start our exploration of the File control in the Designer. Beneath the Palette heading, find the Storage item. Within Storage, find the File control. Drag and drop the File control on to your app. The control is placed below the user interface as it is an invisible control.

After dragging the File control, you’ll see something like this at the bottom of the user interface Designer:
 The real work begins over in the Blocks editor. For this example, we have just a few user interface components:
In the Blocks editor, we will set up some blocks to write text to the file. We will start with a simple example:

btnAddItem.Click is an event handler and you should already be familiar with the concept of event handlers. The new features are those in purple, which reference the File1 control. Assuming you are implementing this in your own app, you should find the File1 control, probably at the bottom of the list of Blocks, at the left side of the Blocks editor.
The first purple item above, AppendToFile, writes a piece of text to the file indicated at the filename component. Writing to the file is the easy part!
When our app’s TestFetch button is pressed, the code initiates a read operation by reference ReadFrom and giving it the name of the file to read the data from. But at this point, the data has not yet been read!
When the data has actually been read, an event occurs and we need to add an event handler for GotText to process the data that has been read in to the app.
In the example above, the original text is read back from the file and placed in an on screen text box to illustrate success.
Writing and reading a single line of text is easy. But writing and reading a series of data elements is a bit more complex. There are several possible ways to handle this but I have chosen to use the mechanism.
But before we get started, let’s add a piece of code to help us during development: let’s always start with a clean data file by deleting the old file (if any) first. We can do this by adding the following code to the screen’s Initialize event:

Find your screen’s name in the Blocks list and then click the mouse over the screen name. You should see the Initialize event handler appear in a pop up list – drag that initialize block over to the Blocks editing window.
Let us now take a look at writing a list – or list of lists to the text file. You’d best be familiar with lists (see volume 1 of my App Inventor 2: Tutorial) before starting on this.
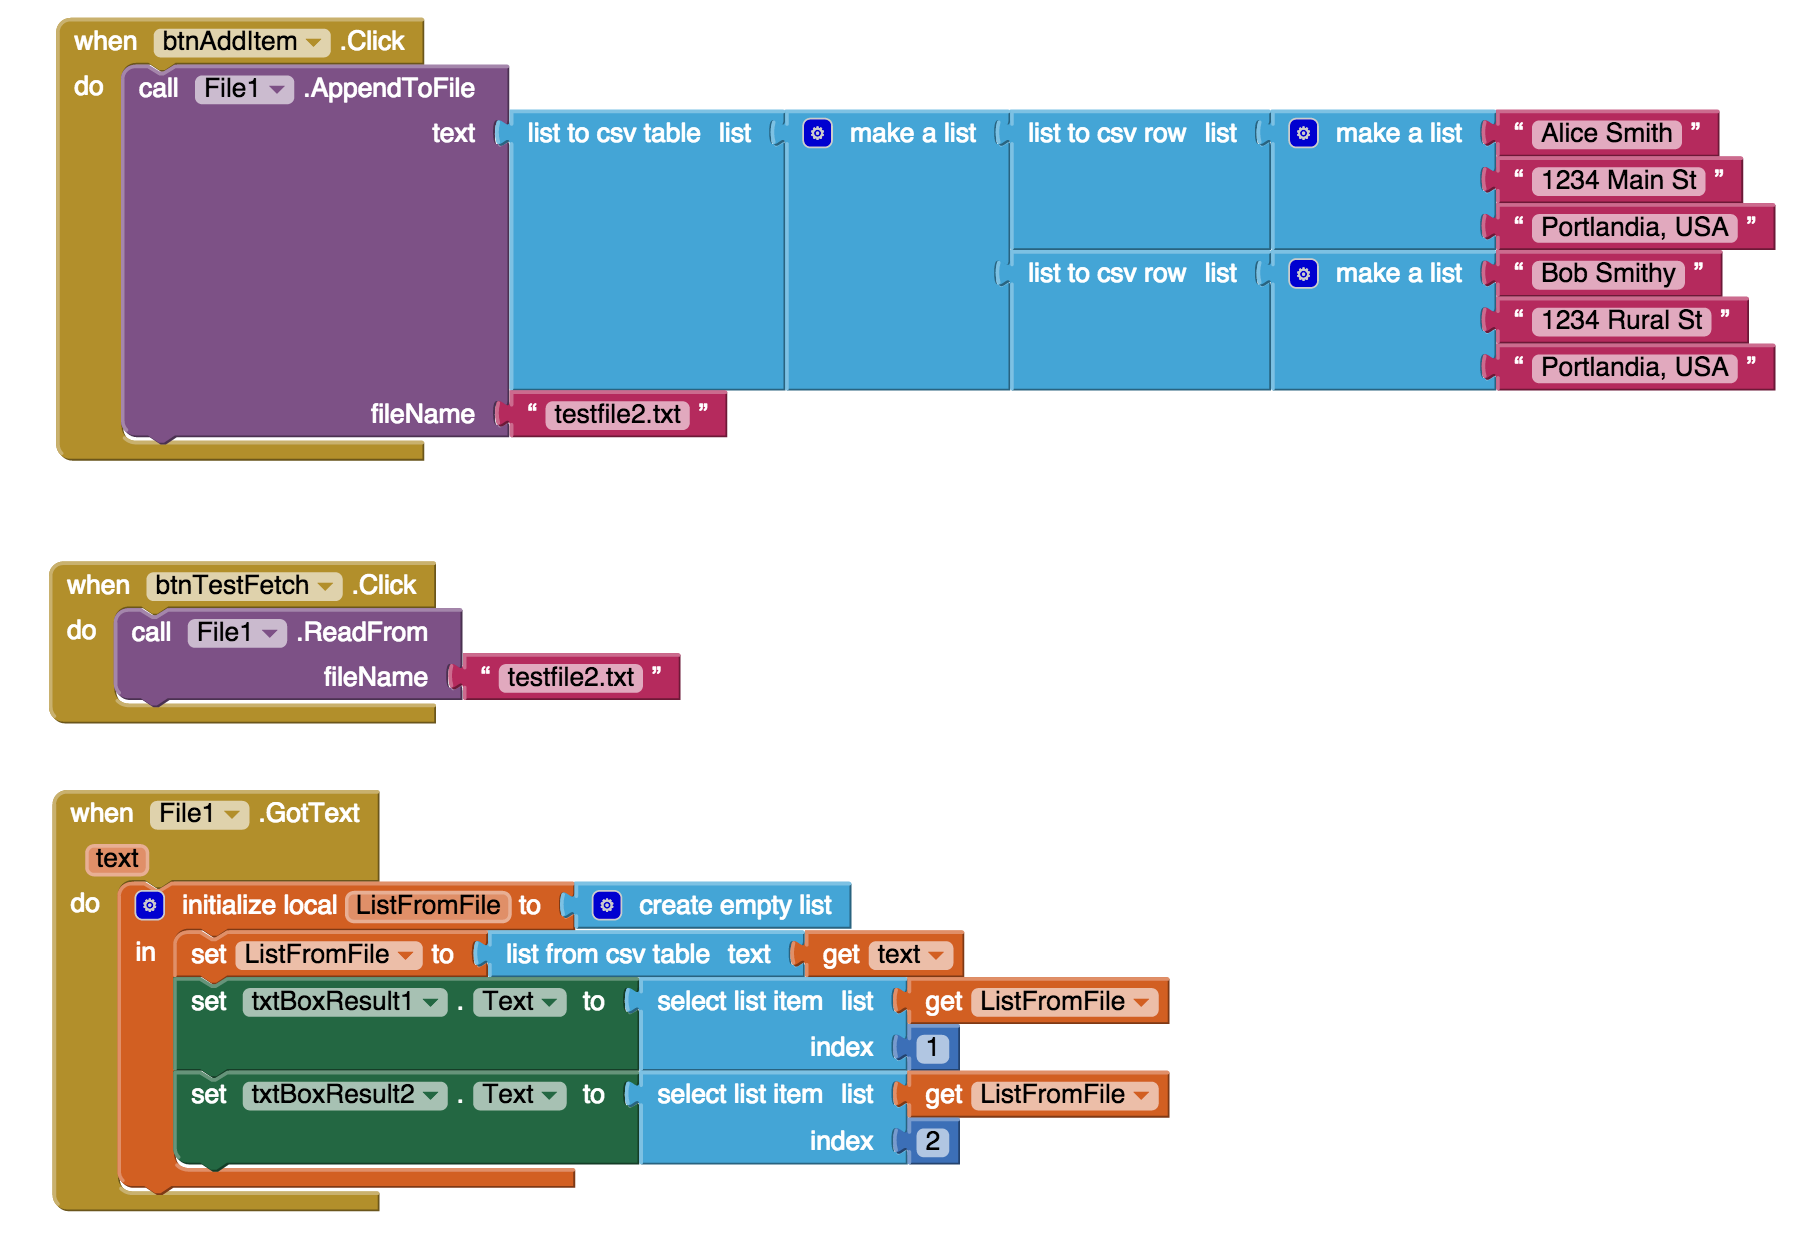
For this example, we want to store a typical name/address combination. This means storing several items for each individual record – in our example, we have two individuals but this could be easily expanded to support more.
The first block creates two lists (at far right) – one list per person to combine the name and address.
These two lists are converted to the “CSV” (comma separate values) format and the two CSV values lists are combined into a table. Think of this as being something like this:
Think of this as being like a spreadsheet with rows and columns, if you prefer. All those blue list processing blocks are converting our text input at right, into two CSV rows, combining those into a list, and then converting to a table. That’s a lot of work but its just a way of storing our more complex data into the file.
At the bottom block, the data read from the file is converted from text back in to table list format. And after this is done, individual list elements can be referenced. Since this table has two rows, index position 1 and index position 2 refer to first and second name records. Since each row is itself a list, we could also select the individual items from each name/address record if we wanted (but that is not shown in this example).
App Inventor’s new File control is helpful but remains cumbersome to use, as shown by the effort to read and write complex records. It works only with text (which is how most of App Inventor works) and it reads the entire file all at once, rather than reading a line at at time. This limits the total size of the file that we can likely handle (maximum size is not known).
On my Nexus 5, there is a visible folder named AppInventor, and within that folder, there is a folder labeled data. This is where testfile2.txt is located.
This location also corresponds to /storage/emulated/0/AppInventor/data, a folder on the phone. You’ll need a file explorer app – or connect your phone to a PC using a USB cable and mount the phone as an external hard drive – to see the file structure on the phone.
My 322 page e-book provides extensive guidance on App Inventor databases and files, including TinyDB, TinyWeb, Fusion Tables and text files.
Learn about all my App Inventor guide books, including sample chapters – here!
